sudo apt-get install r-base r-base-devInstallation
Prerequisites
You need to bring a laptop to conduct the exercises. You also need to install software to participate in this course. Please let us know if you experience issues in the installation. Please try the installation before you attend the meeting, particularly if you are using a device provided through your employer with possibly limited administrator rights.
Please check your setup after installation.
Installation
R is available for free for Windows, GNU/Linux and macOS.
As for now, the latest version is 4.5.2. Only versions 4.5.0 or later are acceptable!
Please upgrade if your system is running an older version.
Windows and macOS
Visit the download page and choose the corresponding installer for your platform.
GNU/Linux
Any GNU/Linux distributions is bundled with a great package manager such as dpkg or rpm. Visit the appropriate web-page for your distribution here.
After you get the correct entry in your package manager, it should be quite easy as:
Install RStudio
RStudio Desktop is an Integrated Development Editor wrapping and interfacing that needs to be installed first. The free-version contains everything you need.
Visit the download page and choose the corresponding installer for your platform.
Please update your RStudio installation to the current version if you had it previously installed.
Open RStudio
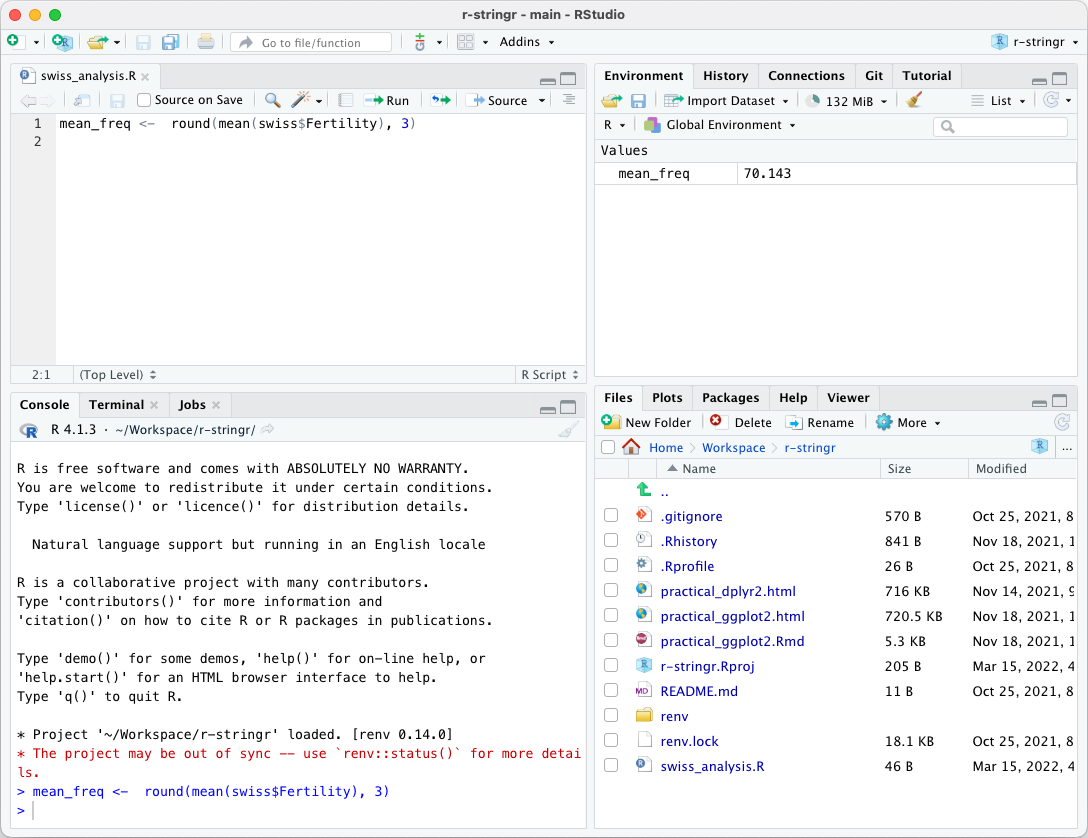
They are four main panels in RStudio. After creating and executing a script, your interface might look like below.
Install the tidyverse package
For plotting, we will use the ggplot package, which is included in the tidyverse collection.
Several other libraries are required for successfully installing the ggplot but should install automatically, so we recommend installing the tidyverse package.
Install from the CRAN
CRAN - the Comprehensive R Archive Network - is the general package repository for.
In RStudio, the bottom-right panel holds five tabs.
- Files
- Plots
- Packages
- Help
- Viewer
Click on the Packages tab (1.) and select the select the Install button (2.). Type dplyr in (3.). You will see the word auto-completion that helps.

It takes some time, usually 10 seconds up to several minutes for a single package depending on its size and compilation stage.
The packages can also be installed in the console (i.e. the bottom-left panel). The snapshot below shows you how to install remotes using the console:

Testing your installation
Copy / paste the code below and you should obtain the following plot.
suppressPackageStartupMessages(library(tidyverse))Warning: package 'ggplot2' was built under R version 4.5.2Warning: package 'readr' was built under R version 4.5.2stopifnot(rlang::is_installed(c("ggplot2"),
version = c("3.5.0")))
penguins |>
ggplot(aes(x = bill_len, y = flipper_len, colour = species)) +
geom_point() +
geom_smooth(method = "lm") +
theme_bw(14)`geom_smooth()` using formula = 'y ~ x'Warning: Removed 2 rows containing non-finite outside the scale range
(`stat_smooth()`).Warning: Removed 2 rows containing missing values or values outside the scale range
(`geom_point()`).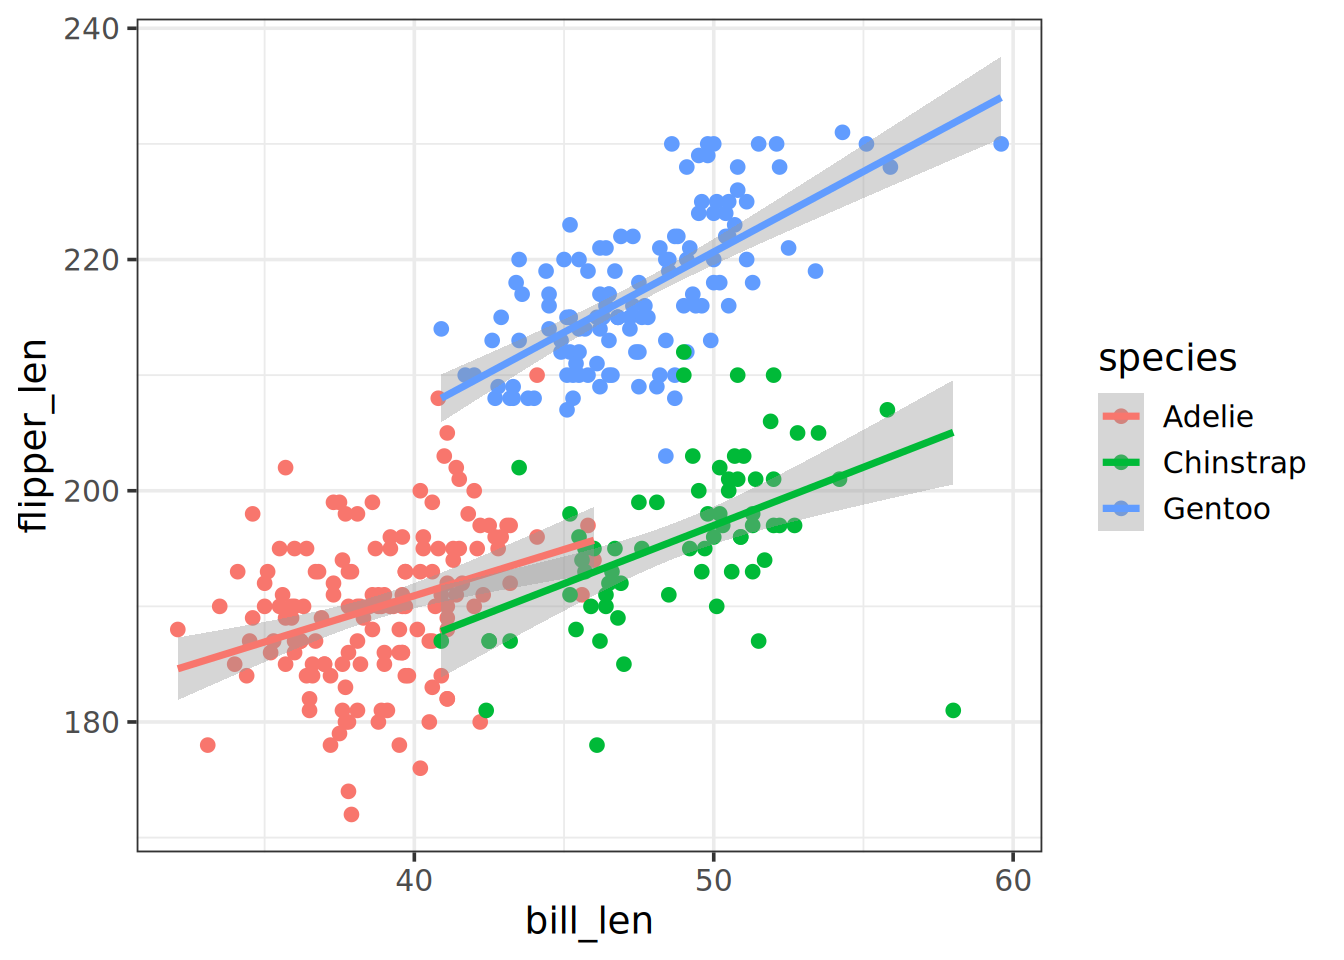
Code versioning
Git installation
Git has become the prevalent code versioning system and will be used in this course. You can skip to test your installation of git and GitHub if you have it installed already and configure SSH to access GitHub.
In any case test your setup.
Windows
The recommended way to integrate Git with RStudio on Windows is via Git Bash, which will install other useful tools. Please download it from Git and start a bash shell by opening Git Bash.
macOS
Check if you have Git already installed by running in the terminal:
git versionThis should put out the current version of your Git installation or an error message such as command not found.
If you do not have Git installed please run the following line in your terminal to install it:
xcode-select --installGNU/Linux
Check if you have Git already installed by running in the terminal:
git versionThis should put out the current version of your git installation or an error message such as command not found.
If you do not have Git installed please run in the terminal:
sudo apt-get install gitGit configuration
Windows/macOS/GNU/Linux users
In RStudio, git should work out of the box but the git tab can be missing in first installations. Create an RStudio project and go to the Terminal pane of RStudio, Git Bash or the terminal in macOS or Linux and perform the first steps as commands, such as git init and git add.
After you have installed Git/Git Bash, configure it by typing in the terminal/Bash:
git config --global user.name "Firstname Lastname"
git config --global user.email "yourEmail@server.com"
Check the configuration by running:
git config --listYou should be able to see your user.name and user.email set accordingly.
Configure your machine to access GitHub
This course is using GitHub classrooms. Please make sure you have an account that you can access.
Go the GitHub signup page. A free account will do for the exercises. We recommend setting up two-factor authentication right away.
If you use older accounts, make sure that you have a working system.
A SSH key deposited at GitHub and connections via ssh are the method of choice for this course.
How SSH (Secure SHell) works briefly is presented below:
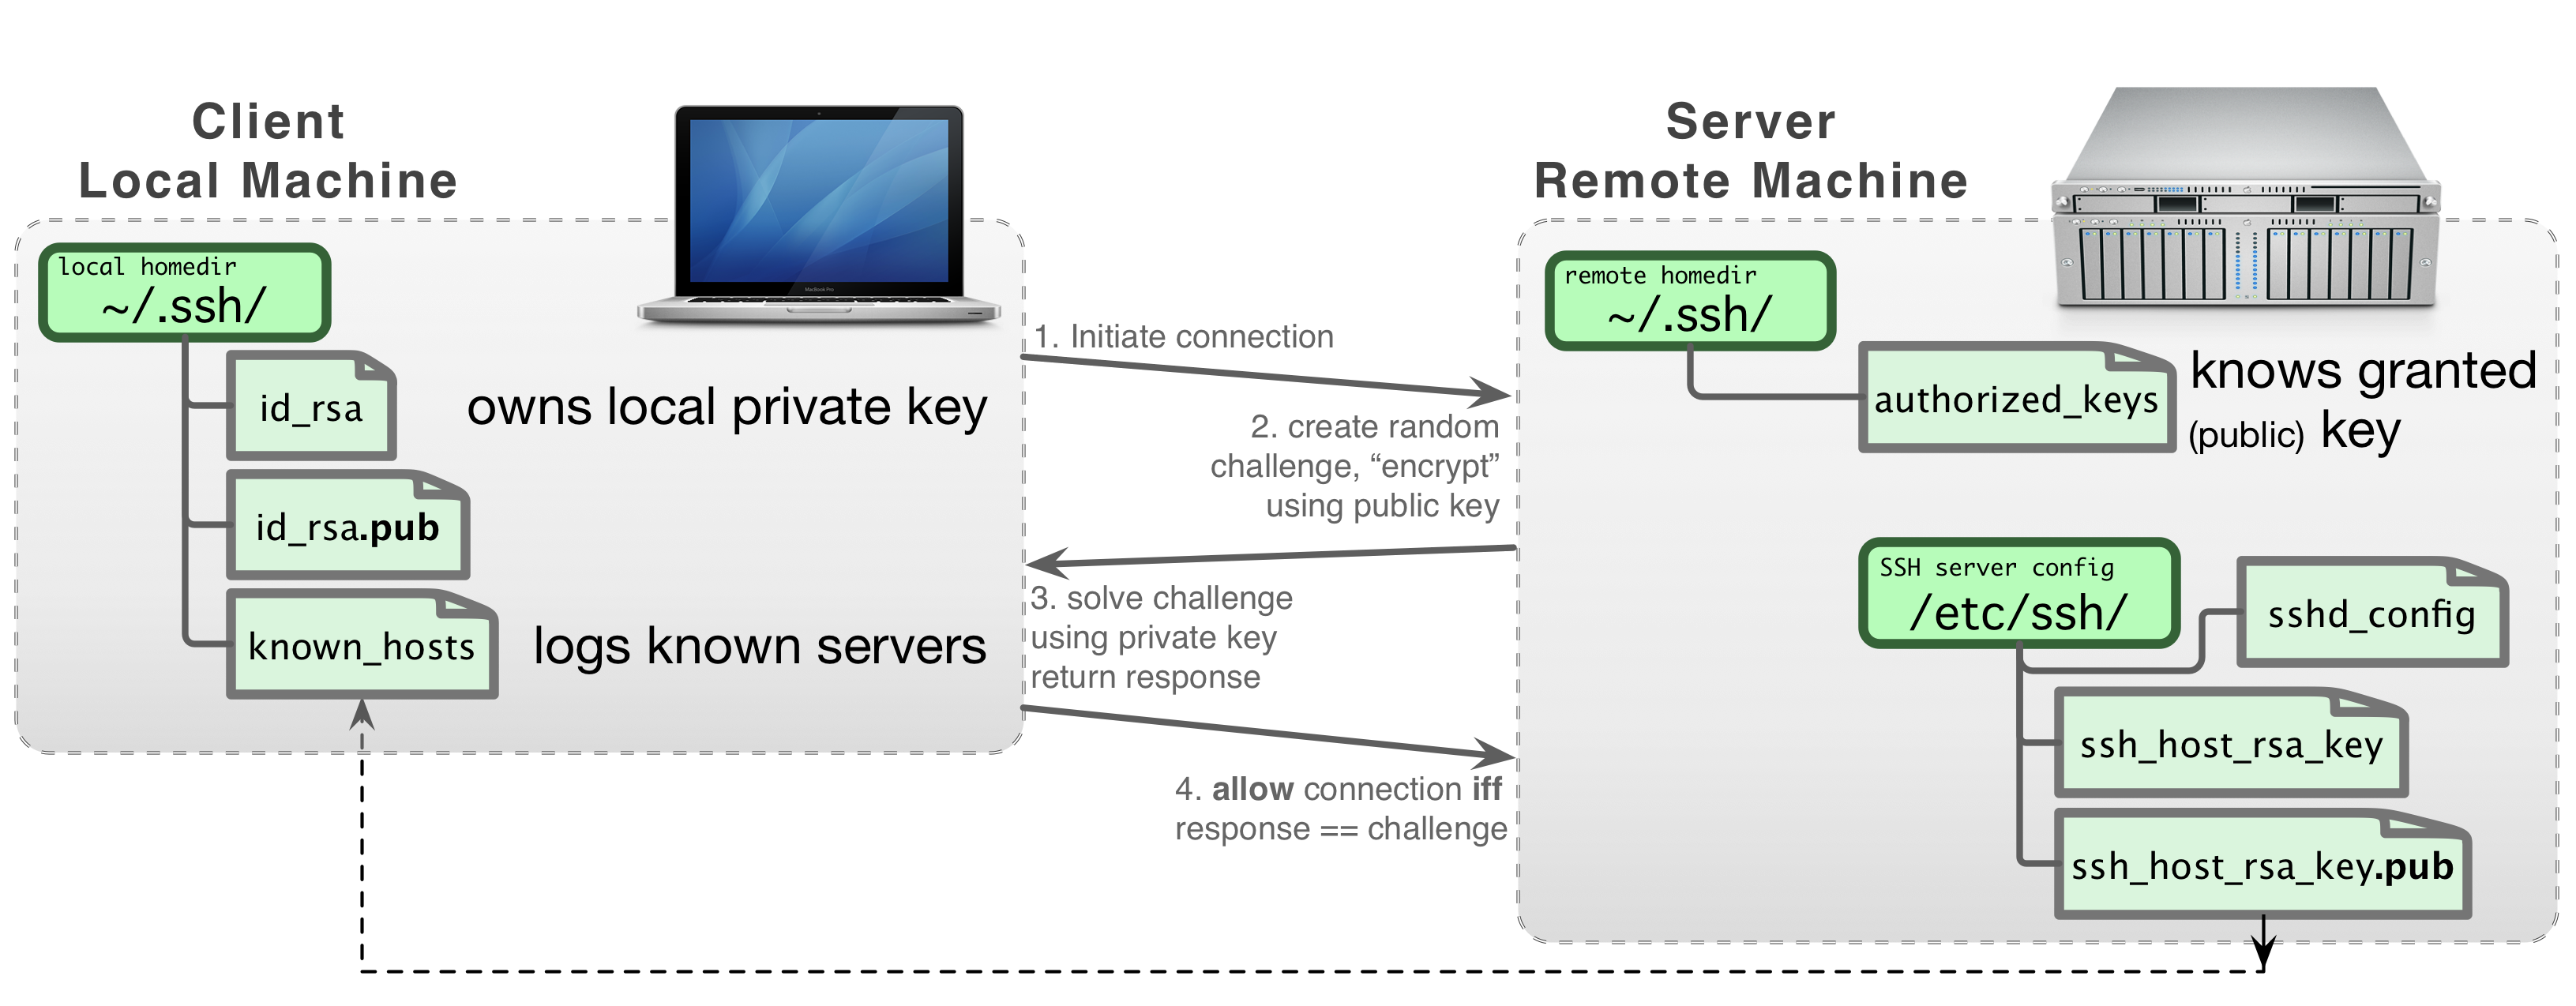 Figure from the UL-HPC technical documentation
Check if a SSH key already exists by running in the terminal/Bash:
ls -al ~/.sshIf there are id_rsa and id_rsa.pub files you already have a pair of SSH keys (private and public, respectively).
If you do not have it yet you have to generate it with the following lines:
- Ensure that the folder
.sshis present:
mkdir -p ~/.ssh- Generate the key pair:
ssh-keygen -t rsa -n 4096Accept the default location by pressing ENTER to the question Enter file in which to save the key (...)
It will then ask you to generate a password, it is recommended to have one.
The successful output should be something like:
[...]
Your identification has been saved in /your_home/.ssh/id_rsa
Your public key has been saved in /your_home/.ssh/id_rsa.pub
The key fingerprint is:
SHA256:snJvBSQLR3SpqqCzSRM6g7Alw88f98cVvbgvnYxawAw root@6ca9e086bf35
The key's randomart image is:
+---[RSA 3072]----+
|     oo ..       |
|    . o.o        |
|     o = E    .  |
|.     o . +  . . |
|+o.  .. S. +  o .|
|==+ .  o  . .o . |
|B+ +..o. .. ..= .|
|++o .oo.o  o.+ + |
|oo   . ...... o. |
+----[SHA256]-----+
If you have entered a password, you need to add the private SSH key (id_rsa) to the ssh-agent by running the following commands:
eval "$(ssh-agent -s)"
ssh-add ~/.ssh/id_rsa
First command returns the process ID of the agent (for example Agent PID 247), the second should return Identity added: /your_name/.ssh/id_rsa
To use the SSH key you should copy the public SSH key (id_rsa.pub) to the clipboard. You can display it with:
cat ~/.ssh/id_rsa.pubOf note, you can use nano or any text editor to open the id_rsa.pub file.
The key starts with ssh-rsa and ends with your email, like this example:
ssh-rsa AAAAB3NzaC1yc2EAAAADAQABAAABgQDZfJj4aQ8gNz4XEfK6LadlKyQ7bhceHNb8PWrzb3Xo116ENFEDF29+1YB60cJItDqbEYmNONRX08N0f0EuOsRCwpiBXhWAb1bzB50hvmMB6FV9vctoLFjwrqaSBrFxQGVOguv6HGUAKt9G8Tx6H/5kwq1Ek7w2y8lxWeCWhiUUqhTC1UZ0k8FsoPyghsJueXJ0S1oRLYNADh59JJVniSLBN+bNcqk8DHyl0kOfn3WeIGNWVEt3Qqb2zan+DTbqOQacsphr7o6htaV2axe3dkR9ff4NmHQUPEL+9kFAt4UOnKc8OHil8vpYwh03UlN86fjVlEAypEgUo/0OZdkeRMbjR9bZ46mcKc6dSSI53W03hP6unldYp1qwHYHMTkuseiqKfY8BVtO6QLE0CYpqs5YPi2Pmkq9ghaEpP+UgsZxZ+a0tTZ9Ckv3kBBoBzGr0NCXQmAA2UmHrbWvEq0vfDvSnP20zJERWxrg6sf7GXEJRmPFkpxPvjDYrmJjFPfBvT0= name@domain.comSelect and copy the totality to the clipboard.
Finalise the connection
- Go to your GitHub account, open Settings

- In the SSH and GPG keys section add your public SSH key by clicking the New SSH key button.

- Give the name of your choice to the key (
my_keyhere) and paste it in the Key field.

- Check that the SSH key is validated, as below

More information can be found on this page.
Troubleshooting
If you encountered issues with package installation on Mac or Linux, install them with:
- in a terminal, for GNU/Linux:
sudo apt install -y libcurl4-openssl-dev libssl-dev libxml2-dev- in a terminal, for MacOS and
brew:
brew install libxml2 opensslthen in R, install the tidyverse.
install.packages("tidyverse")If not, please contact me with a description of the error message.